AppExtractAI User Guide
Table of Contents
- Introduction
- Getting Started
- Dashboard Overview
- Creating Extraction Templates
- Processing Applications
- Reviewing Extracted Information
- Monitoring Extraction Runs
- Managing Completed Extractions
- Accessing Extraction Results
- Managing Extraction Data
- Billing and Subscription Plans
- Best Practices
- Support
Introduction
AppExtractAI is a powerful tool designed to streamline your application review process. It allows you to extract customized fields from uploaded applications, creating summary PDFs and Excel dataframes for efficient analysis.
Getting Started
To begin using AppExtractAI, log in to your account at appextractai.com. You'll be greeted with the main dashboard, which serves as your central hub for all activities.
Dashboard Overview
The dashboard provides a quick view of your current application processing status:

- Sidebar Navigation: Access different sections of the app, including Organization settings, Dashboard, Templates, and Billing.
- Main Content Area: Displays a table of your application batches, including their Title, Status, number of Applications, Creation Date, and Automatic Deletion Time.
- Process Applications: Click this button in the top right to start processing a new batch of applications.
Creating Extraction Templates
Extraction templates define what information you want to extract from applications:
- Navigate to the "Templates" section from the sidebar.

- Click the "New" button to create a new template.
- Add fields to your template by clicking "New Field".

- For each field, provide a title and description. For example:
- Title: "Senior project manager"
- Description: "Applicant has worked as senior project manager (1 if yes, 0 if no)"
- Note that the description is the language which is used by the application processor to extract the information.
- Continue adding fields as needed.

Processing Applications
To process applications:
-
From the dashboard, click the "Process Applications" button.

-
Select a template to use for extraction. Choose from the dropdown menu (e.g., "Template 1").

-
Upload your application files:
- Click the upload area or drag and drop files into the designated box.
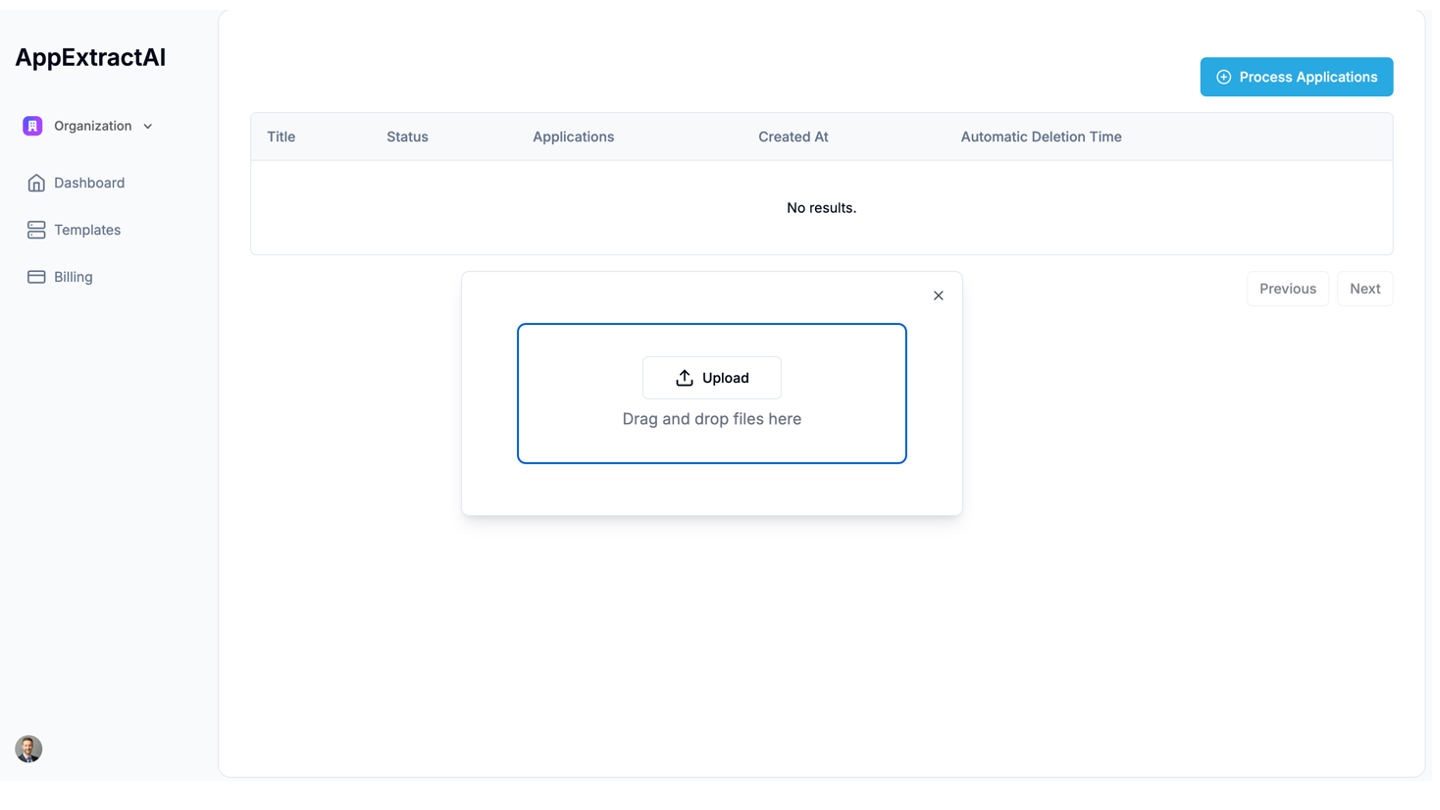
- You can select multiple PDF files from your computer.
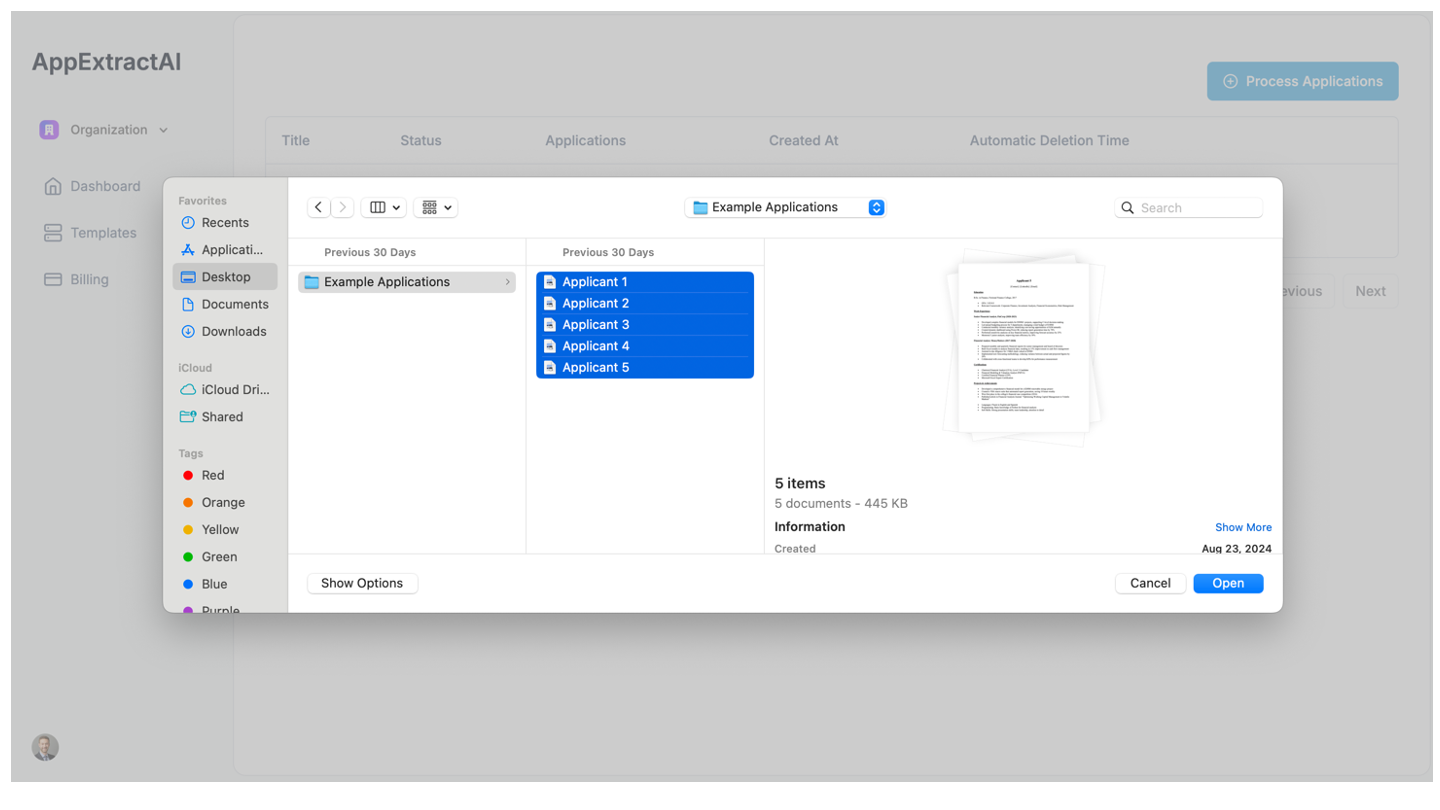
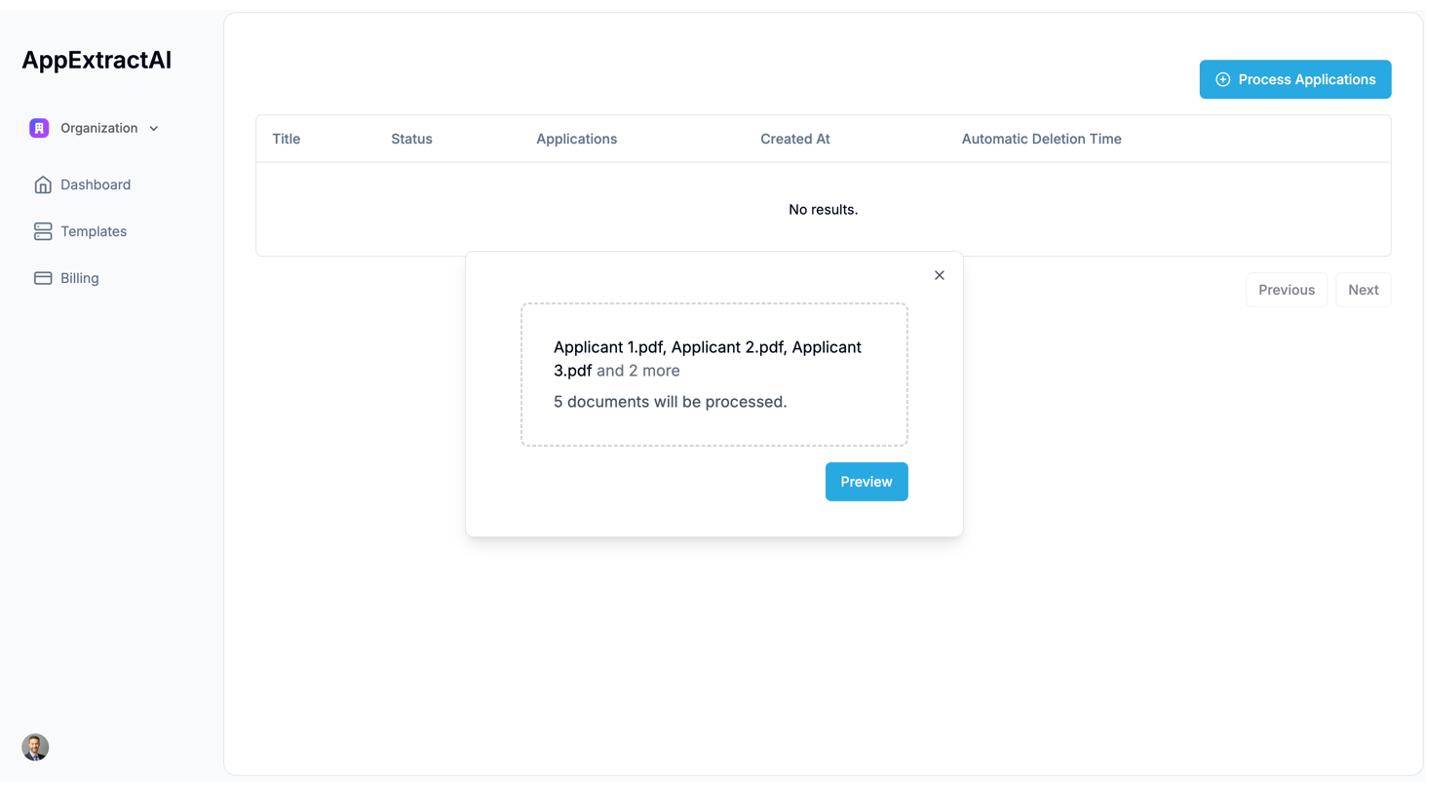
- The system will confirm the number of documents to be processed.
- Click the upload area or drag and drop files into the designated box.
-
After uploading, you'll see a confirmation message with the names of the uploaded files.
-
Click "Preview" to review the extracted information.
Reviewing Extracted Information
After processing, review the extracted information for one applicant before running on the rest of the applications:

- The preview screen will show a summary of the extracted data for one applicant.
- Review the information to confirm that the tool is extracting the information you want.
- Click "Accept Preview" if the information is correct, or go back to make adjustments if needed.
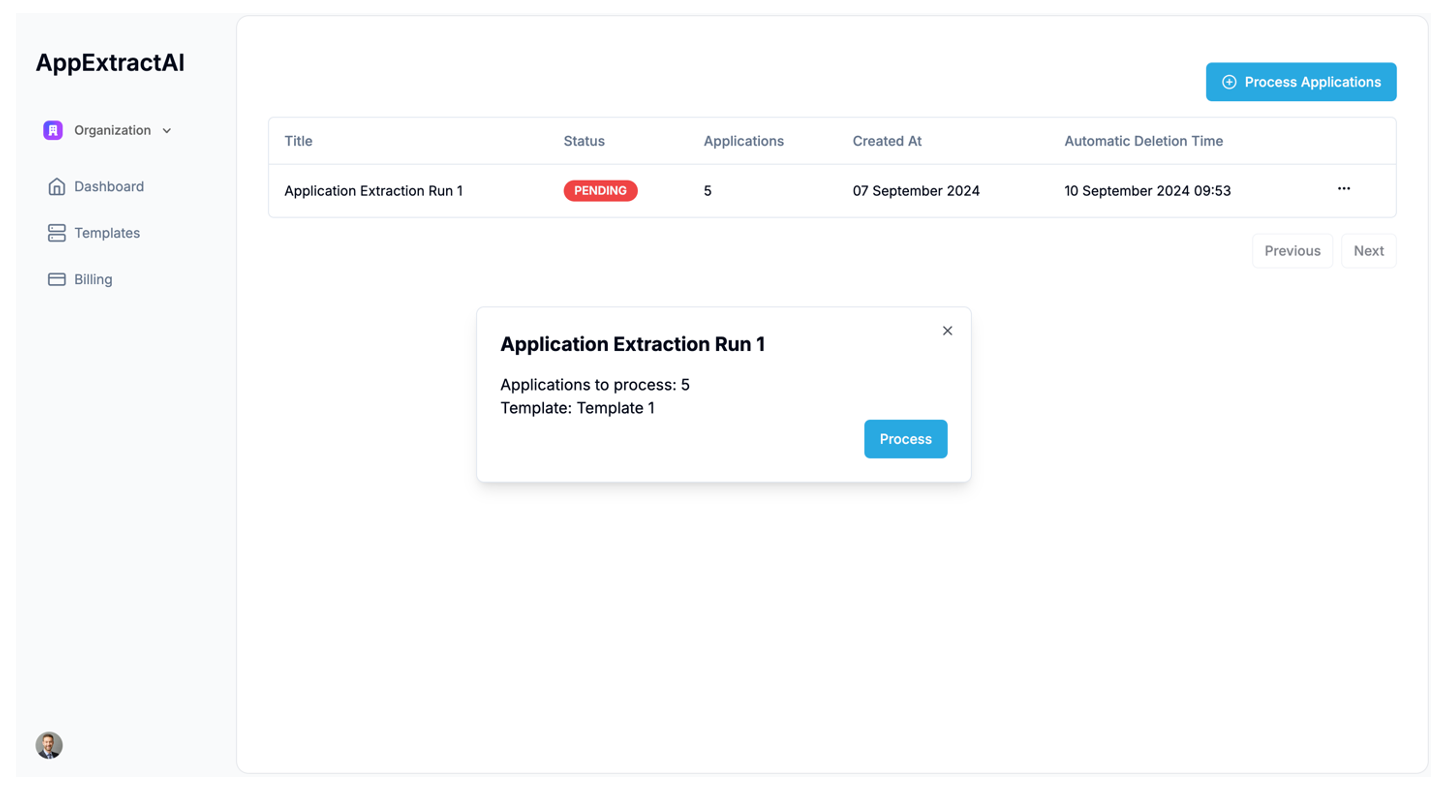
- After clicking "Accept Preview", click "Process" to start the extraction run.
Tips for Efficient Use
- Prepare your applications in PDF format before uploading.
- Ensure your extraction template includes all the fields you want to analyze.
Monitoring Extraction Runs
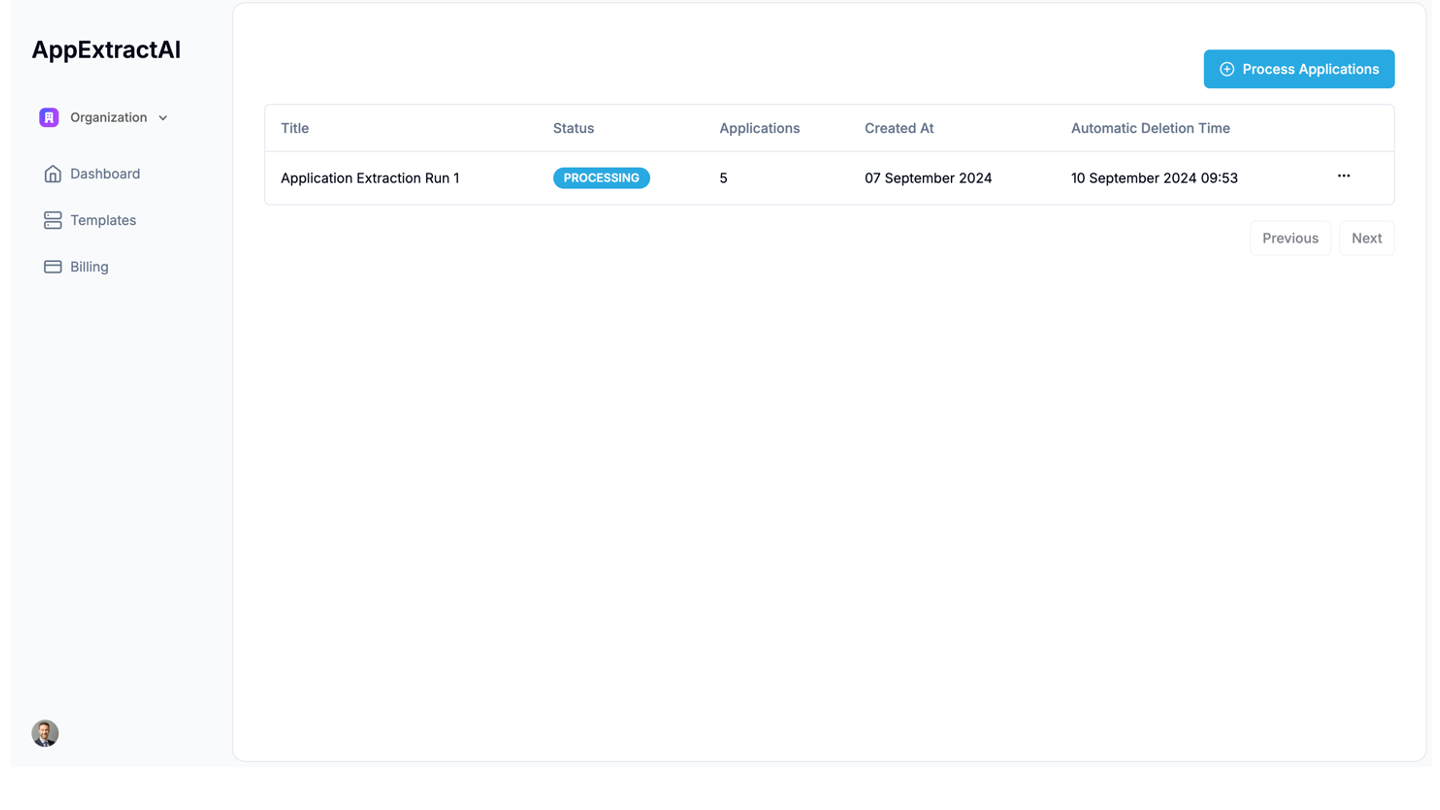
Once you've started an extraction run, you can monitor its progress on the dashboard:
-
The dashboard displays all your extraction runs, including:
- Title (e.g., "Application Extraction Run 1")
- Status
- Number of Applications
- Created At (date and time)
- Automatic Deletion Time
-
Extraction Run Statuses:
- PENDING: The run is queued and waiting to start processing.
- PROCESSING: The AI is actively extracting information from the applications.
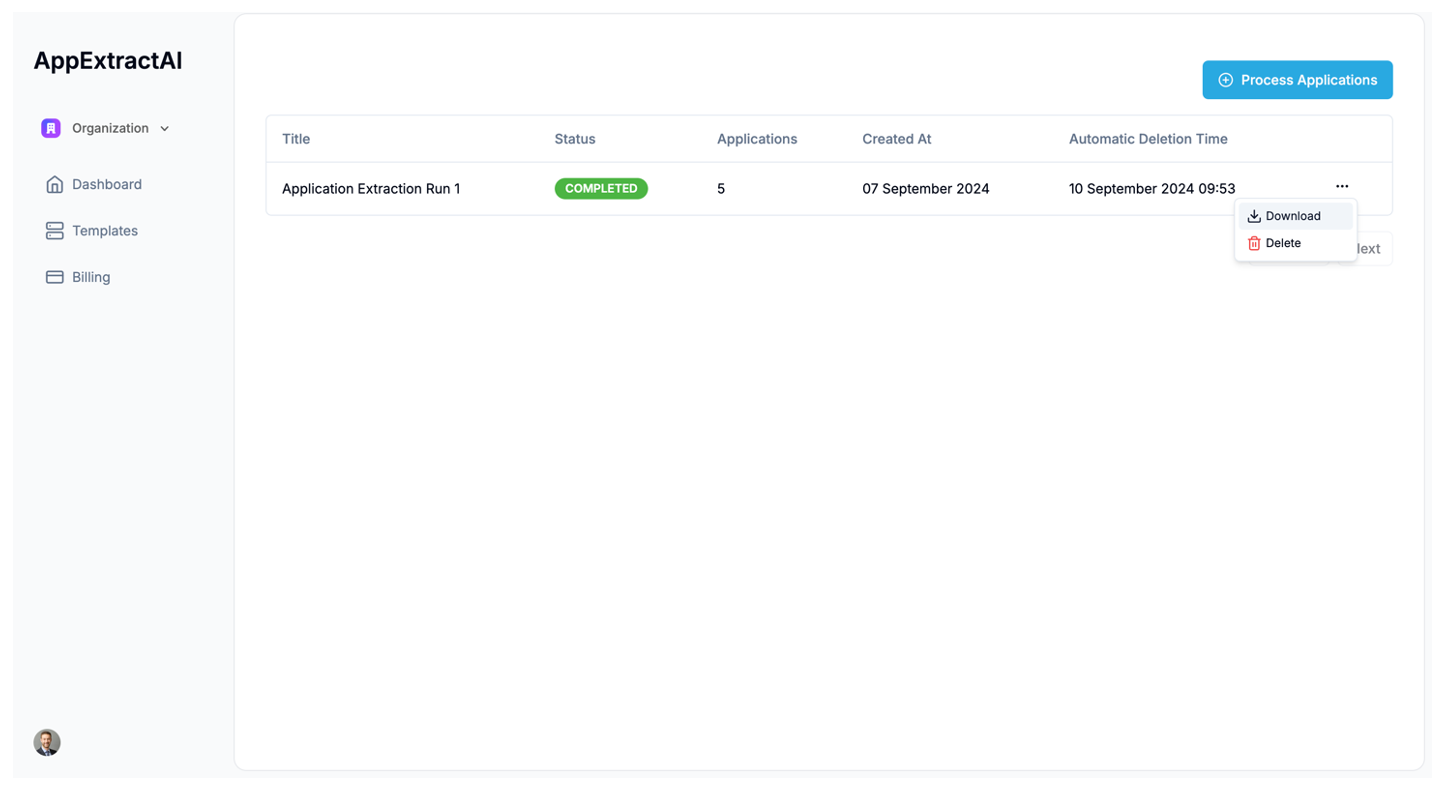
- COMPLETED: The extraction process has finished successfully.
-
Each extraction run will show:
- The template used (e.g., Template 1)
- The number of applications being processed
Managing Completed Extraction Runs
After an extraction run is completed, you have several options:
-
Download Results:
- Click the "Download" button (looks like a download icon) next to the completed run.
- This will likely download an Excel file or PDF with the extracted data.
-
Delete Run:
- If you no longer need the extraction run, click the "Delete" button (trash can icon).
- Be cautious when deleting, as this action is usually irreversible.
-
Automatic Deletion:
- Note the "Automatic Deletion Time" for each run.
- The system will automatically remove the extraction run and its data at this time to maintain data privacy and manage storage.
Accessing Extraction Results
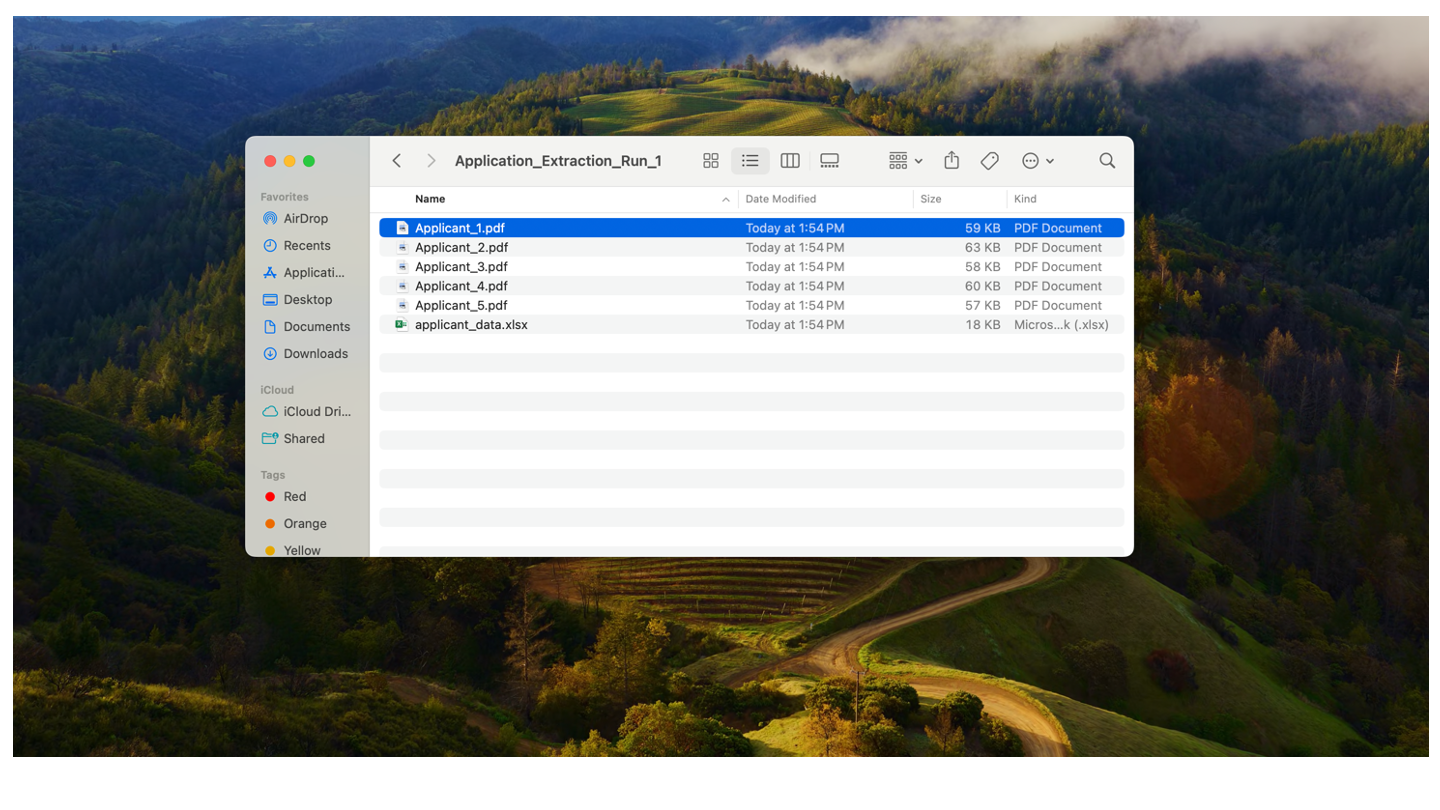
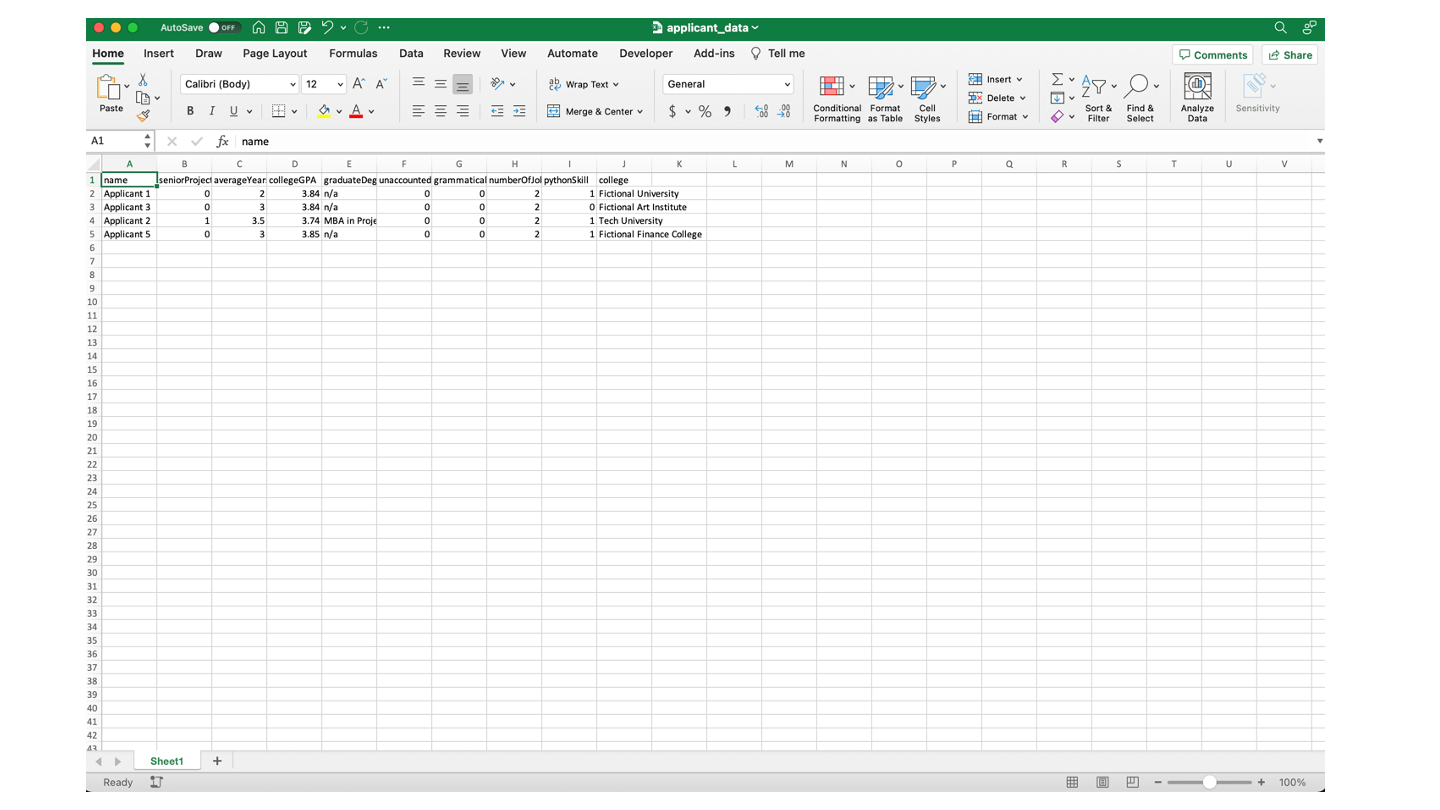
After an extraction run is completed, download and unzip the zip file. You can access the results in multiple formats:
-
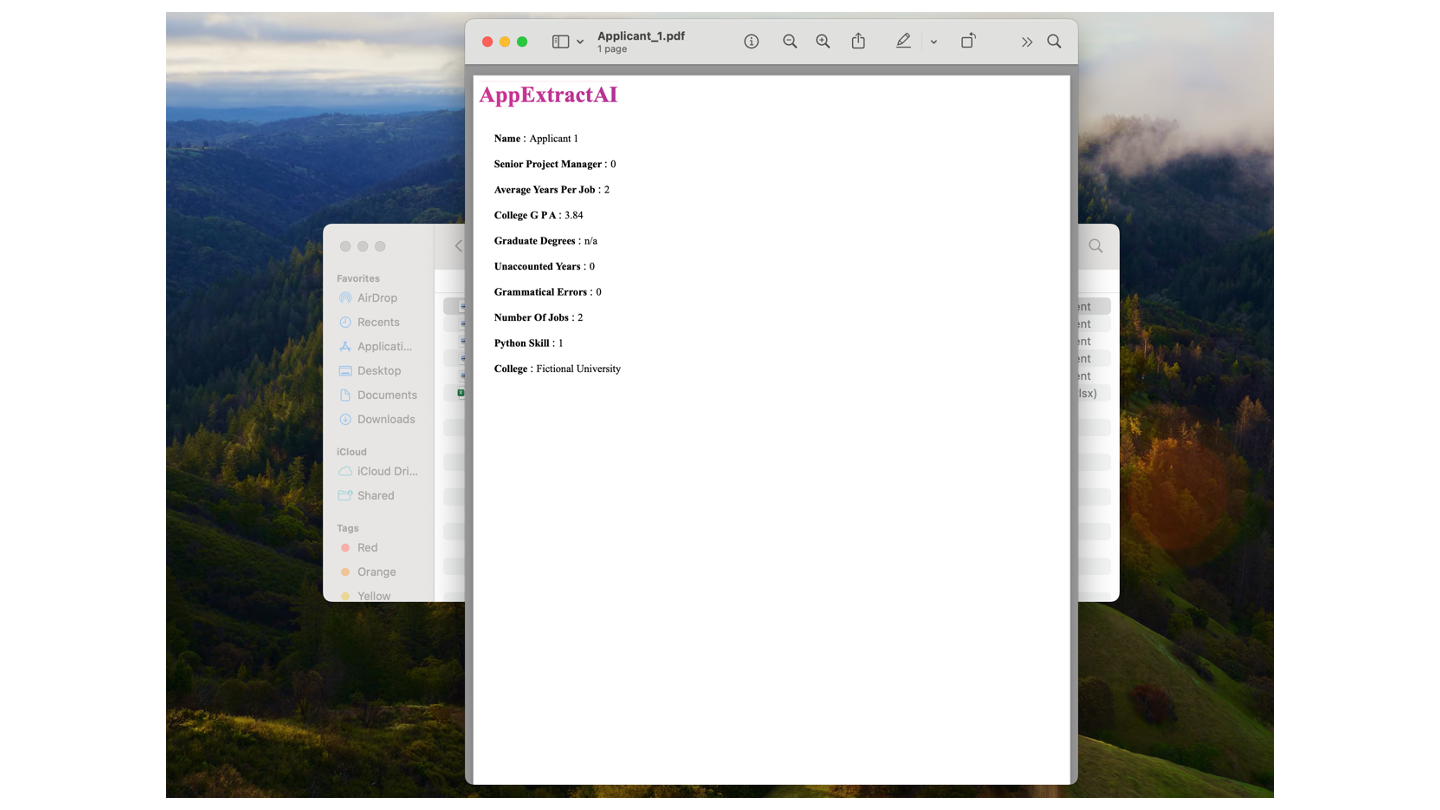
Individual PDF Summaries:
- For each processed application, a PDF file is generated (e.g., Applicant_1.pdf, Applicant_2.pdf).
- These PDFs contain a summary of the extracted information for each applicant.
- You can find these files in your downloads folder.
-
Excel Spreadsheet:
- An Excel file is also generated, containing all extracted data in a tabular format.
- Each row represents an applicant, and columns represent different fields (e.g., Name, Senior Project Manager, Average Years Per Job, etc.).
- This format is particularly useful for sorting, filtering, and analyzing data across multiple applicants.
Managing Extraction Data
AppExtractAI provides options for managing your extraction data:
-
Manual Deletion:
- You can manually delete extraction data for completed runs.
- A confirmation dialog will appear to prevent accidental deletion.
-
Automatic Deletion:
- For data privacy and storage management, all extraction data is automatically deleted 72 hours after creation.
- Make sure to download any important data before this automatic deletion occurs.
Billing and Subscription Plans
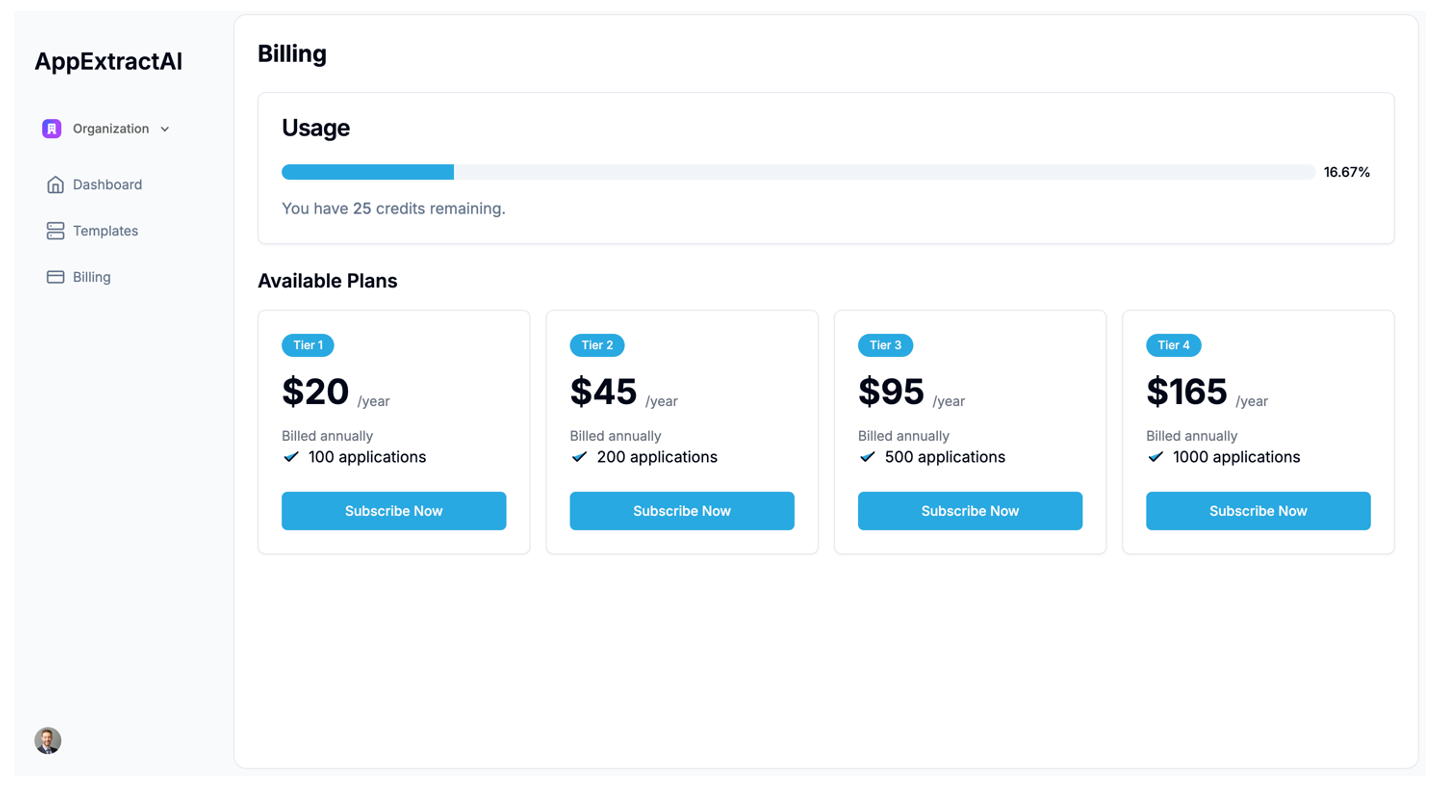
AppExtractAI offers various subscription plans to suit different needs:
-
Usage Tracking:
- Your current usage is displayed at the top of the Billing page.
- The system shows how many credits (applications) you have remaining.
-
Available Plans:
- Tier 1: $20/year for 100 applications
- Tier 2: $39/year for 200 applications
- Tier 3: $95/year for 500 applications
- Tier 4: $165/year for 1000 applications
-
Subscribing:
- To subscribe to a plan, click the "Subscribe Now" button under the desired tier.
- You'll be billed annually for the selected plan.
-
Upgrading/Downgrading:
- You can change your plan at any time by selecting a different tier.
- If you need more than 1000 applications per year, contact customer support for custom plans.
Best Practices
- Regularly check your usage to ensure you have enough credits for your needs.
- Download and backup important extraction results before the 72-hour automatic deletion period.
- Choose a subscription plan that aligns with your expected annual application volume, with some buffer for unexpected increases.
Support
- If you have any suggestions, questions, or need help, contact us at mac.singer@appextractai.com.